GitHub CLI 实战指南:从命令行管理 Issues、PR、Actions 与 Release 的完整工作流
为什么你需要 GitHub CLI
如果你每天都在 GitHub 上协作,但每次操作都要切到浏览器——新建 Issue、发起 PR、查看 CI 跑完没有、下载 Release 产物——那你的工作流里至少有 30% 的时间花在了"切换上下文"上。GitHub CLI(命令名 gh)就是为解决这个问题而生的:它把 GitHub 的核心功能搬到了终端里,让你在一个窗口内完成从代码提交到 PR 合并的全流程。
本文从安装认证讲起,覆盖仓库管理、Issue、PR、Actions、Release、扩展生态和高级配置,帮你把 gh 真正融入日常开发工作流。
一、安装与认证:三分钟搞定
1.1 多平台安装
macOS 用户最简单,Homebrew 一行搞定:
# macOS
brew install gh

# Ubuntu / Debian (官方源)
curl -fsSL https://cli.github.com/packages/githubcli-archive-keyring.gpg | sudo dd of=/usr/share/keyrings/githubcli-archive-keyring.gpg
echo "deb [arch=$(dpkg --print-architecture) signed-by=/usr/share/keyrings/githubcli-archive-keyring.gpg] https://cli.github.com/packages stable main" | sudo tee /etc/apt/sources.list.d/github-cli.list > /dev/null
sudo apt update && sudo apt install gh

# Windows (winget)
winget install GitHub.cli

# Windows (scoop)
scoop install gh
1.2 认证登录
安装完成后,第一步是认证。gh auth login 会引导你完成整个流程:
$ gh auth login
? What account do you want to log into? GitHub.com
? What is your preferred protocol for Git operations on this host? HTTPS
? Authenticate Git with your GitHub credentials? Yes
? How would you like to authenticate GitHub CLI? Login with a web browser

! First copy your one-time code: XXXX-XXXX
Press Enter to open github.com in your browser...
浏览器会打开 GitHub 授权页面,输入一次性代码即可完成认证。如果你在服务器上没有浏览器,可以选择 Paste an authentication token,用 Personal Access Token 登录。
验证认证状态:
gh auth status
# 输出示例:
# github.com
#   ✓ Logged in to github.com as your-username
#   ✓ Git operations for github.com configured as https
# ✓ Token: gho_xxxx... (with repo, read:org, workflow scopes)实用技巧:如果你有多个 GitHub 账号(比如个人号和公司号),可以用 gh auth login --hostname github.enterprise.com 添加企业版 GitHub,再通过 GH_HOST 环境变量切换。
二、仓库管理:clone、fork、create、view
2.1 克隆与 Fork
gh repo clone 比 git clone 更智能——你只需要写仓库名,不需要完整 URL:
# 克隆自己的仓库
gh repo clone my-awesome-project

# 克隆别人的仓库(自动补全 owner)
gh repo clone facebook/react

# Fork 并克隆到本地
gh repo fork cli/cli --clone=true
2.2 创建新仓库
再也不用先去网页上建仓库再回来 push 了:
# 创建公开仓库并推送当前目录
gh repo create my-new-project --public --source=. --remote=origin --push

# 创建私有仓库,带描述和 .gitignore 模板
gh repo create my-secret-project --private --description="实验性项目" --gitignore Python
2.3 查看仓库信息
# 在终端查看仓库 README
gh repo view cli/cli

# 在浏览器中打开仓库
gh repo view --web

# 查看仓库的 license、语言、stars 等元信息
gh repo view owner/repo --json name,description,licenseInfo,stargazerCount,primaryLanguage
三、Issue 管理:创建、筛选、批处理
3.1 创建 Issue
gh issue create 支持交互式和参数式两种模式:
# 交互式创建(会打开编辑器写 body)
gh issue create --title "登录页面在 Safari 下样式错乱"

# 参数式创建,带 label 和 assignee
gh issue create \
  --title "API 返回 500 错误" \
  --body "调用 /api/users 接口时返回 500,日志见附件" \
  --label "bug,priority-high" \
  --assignee "@me" \
--project "Q3 Sprint"进阶技巧:用 --body-file 从文件读取 Issue 内容,配合模板实现批量创建:
# 从 markdown 文件读取内容
gh issue create --title "重构用户模块" --body-file ./docs/refactor-plan.md

# 批量创建 Issue(shell 脚本)
while IFS='|' read -r title body; do
  gh issue create --title "$title" --body "$body" --label "tech-debt"
done < issues.csv
3.2 查看与筛选 Issue
# 列出分配给我的 open issue
gh issue list --assignee "@me" --state open

# 按标签筛选
gh issue list --label "bug" --limit 20

# 查看 Issue 详情(含评论)
gh issue view 42

# 查看 Issue 并在浏览器打开
gh issue view 42 --web
3.3 评论与状态管理
# 添加评论
gh issue comment 42 --body "已复现,正在排查"

# 关闭 Issue
gh issue close 42 --comment "已在 v2.3.1 修复"

# 重新打开
gh issue reopen 42
四、Pull Request 工作流:从创建到合并
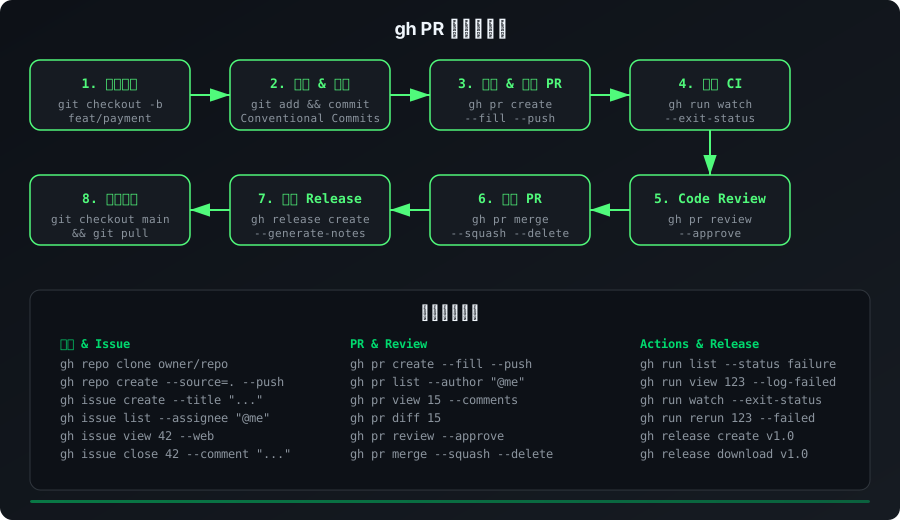
PR 是 gh 最强大的功能模块。一个完整的终端内 PR 工作流如下:
4.1 创建 PR
# 自动检测当前分支的 commit 作为 PR 标题和 body
gh pr create --fill

# 自定义标题和描述
gh pr create \
  --title "feat: 添加用户头像上传功能" \
  --body "## 改动内容
- 新增 POST /api/avatar 接口
- 前端裁剪组件集成
- 添加单元测试

## 测试
- [x] 本地测试通过
- [x] lint 无报错" \
  --base main \
  --head feature/avatar-upload \
  --reviewer "alice,bob" \
  --assignee "@me" \
  --label "feature"
--fill 是最常用的参数,它会自动从最近的 commit message 中提取标题和正文。如果你遵循 Conventional Commits 规范,PR 信息会自动填充得很好。
4.2 查看 PR 状态与 Review
# 查看当前仓库的 open PR 列表
gh pr list

# 查看 PR 详情(含 CI 状态、review 状态)
gh pr view 15

# 查看 PR 的 diff
gh pr diff 15

# 查看 PR 的 review 评论
gh pr view 15 --comments
4.3 Review 与合并
# 在终端完成 Code Review(带 approve)
gh pr review 15 --approve --body "LGTM,逻辑清晰,测试覆盖到位"

# Request changes
gh pr review 15 --request-changes --body "请处理边界情况:空数组输入"

# 合并 PR(三种方式)
gh pr merge 15 --squash --delete-branch   # squash 合并并删除分支
gh pr merge 15 --merge                    # 普通合并
gh pr merge 15 --rebase                   # rebase 合并
4.4 Checkout 别人的 PR
这是 gh 最被低估的功能之一。同事发了一个 PR,你想在本地跑一下:
# 直接 checkout PR 到本地分支
gh pr checkout 15

# 完成测试后切回主分支
git checkout main
git branch -d feature/avatar-upload
五、GitHub Actions:在终端监控 CI/CD
5.1 查看运行状态
# 列出最近的 workflow 运行
gh run list --limit 10

# 只看失败的运行
gh run list --status failure --limit 5

# 查看某次运行的详情
gh run view 12345678

# 查看失败步骤的日志
gh run view 12345678 --log-failed
5.2 重新触发与取消
# 重新运行失败的 job
gh run rerun 12345678 --failed

# 重新运行整个 workflow
gh run rerun 12345678

# 取消正在运行的 workflow
gh run cancel 12345678
5.3 实时监控
gh run watch 会实时跟踪运行进度,像 tail -f 一样:
# 实时监控当前分支的最新运行
gh run watch

# 监控指定运行,完成后退出
gh run watch 12345678 --exit-status实战场景:push 后立即监控 CI,在终端一个窗口跑 gh run watch,另一个窗口继续写代码。CI 跑完会有通知,如果 --exit-status 检测到失败会返回非零退出码,可以串联到脚本中。
5.4 手动触发 Workflow
对于配置了 workflow_dispatch 触发器的 workflow,可以直接从命令行手动触发:
# 触发部署 workflow,传入参数
gh workflow run deploy.yml \
  --ref main \
  -f environment=production \
  -f version=v1.4.0

# 查看 workflow 运行列表
gh run list --workflow=deploy.yml --limit 5
这个功能在需要手动控制发布节奏的场景下非常实用——不需要打开浏览器去 GitHub Actions 页面点按钮,一条命令就能触发部署流水线。
六、Release 管理:发布与下载
6.1 创建 Release
# 基于最新 tag 创建 Release
gh release create v1.2.0 \
  --title "v1.2.0 - 性能优化版本" \
  --notes "## 新特性
- 用户搜索响应速度提升 40%
- 新增批量导入功能

## 修复
- 修复内存泄漏问题 (#42)
- 修复时区显示错误 (#45)" \
  --latest

# 上传构建产物
gh release upload v1.2.0 ./dist/app-v1.2.0-linux-amd64.tar.gz ./dist/app-v1.2.0-darwin-arm64.tar.gz
6.2 下载 Release 产物
# 列出某个 Release 的所有产物
gh release view v1.2.0 --json assets

# 下载指定文件
gh release download v1.2.0 --pattern "app-v1.2.0-linux-amd64.tar.gz"

# 下载所有产物到指定目录
gh release download v1.2.0 --dir ./downloads
6.3 自动生成 Release Notes
GitHub 支持基于 PR 和 commit 自动生成 Release Notes:
# 使用 GitHub 自动生成的 notes
gh release create v1.3.0 --generate-notes --latest
自动生成的 notes 会按照 PR 的 label 分类(如 feature、bug),前提是你的仓库配置了 label 分类规则。
七、gh 扩展生态:打造你的专属工具
gh 支持通过扩展(extension)增强功能。扩展可以是本地脚本,也可以从 GitHub 仓库安装:
7.1 安装社区扩展
# 安装热门扩展
gh extension install dlvhdr/gh-dash        # PR/Issue 仪表盘
gh extension install vilmibm/gh-user-status # 设置用户状态
gh extension install meiji163/gh-notify     # 通知管理

# 列出已安装扩展
gh extension list

# 升级所有扩展
gh extension upgrade --all
7.2 创建自定义扩展
任何可执行脚本都可以成为 gh 扩展。创建一个名为 gh-mycommand 的脚本,放在 PATH 中即可:
#!/usr/bin/env bash
# gh-quick-pr: 快速创建 PR 的自定义扩展
set -e

BRANCH=$(git branch --show-current)
TITLE=${1:-"WIP: $BRANCH"}

gh pr create \
  --title "$TITLE" \
  --body "自动创建的草稿 PR" \
  --draft

echo "Draft PR created for $BRANCH"
# 赋予执行权限后直接使用
gh quick-pr "feat: 添加搜索功能"八、高级技巧与别名配置
8.1 Shell 别名
在 ~/.bashrc 或 ~/.zshrc 中添加常用别名:
# 快速创建并推送 PR
alias ghpr='gh pr create --fill --push 2>/dev/null && gh pr view --web'

# 查看我的 PR
alias ghmy='gh pr list --author "@me" --state open'

# CI 监控
alias ghci='gh run watch --exit-status'

# 快速 fork 并 clone
alias ghfork='gh repo fork --clone=true --remote=true'
8.2 JSON 输出与 jq 管道
几乎所有 gh 命令都支持 --json 输出,配合 jq 可以做复杂查询:
# 找出所有没有 assignee 的 open issue
gh issue list --state open --json number,title,assignees \
  --jq '.[] | select(.assignees | length == 0) | "#\(.number) \(.title)"'

# 统计各 label 的 PR 数量
gh pr list --state open --json labels \
  --jq '[.labels[].name] | group_by(.) | map({label: .[0], count: length}) | sort_by(-.count)'

# 导出仓库所有 PR 标题和 URL
gh pr list --state all --limit 100 \
  --json number,title,url \
  --jq '.[] | "\(.number)\t\(.title)\t\(.url)"' > pr-export.tsv
8.3 在 CI/CD 中使用 gh
在 GitHub Actions 中,gh 已预装。利用 GITHUB_TOKEN 可以实现自动化操作:
# .github/workflows/auto-close-stale.yml
name: Close Stale Issues
on:
  schedule:
    - cron: '0 0 * * *'  # 每天执行

jobs:
  close-stale:
    runs-on: ubuntu-latest
    steps:
      - run: |
          # 查找 30 天未活动的 issue 并关闭
          gh issue list --state open --search "updated:<$(date -d '30 days ago' +%Y-%m-%d)" \
            --json number --jq '.[].number' | while read issue; do
            gh issue comment "$issue" --body "30 天无活动,自动关闭。如有需要请重新打开。"
            gh issue close "$issue"
          done
        env:
          GH_TOKEN: ${{ secrets.GITHUB_TOKEN }}
九、常用命令速查表
| 场景 | 命令 | 说明 |
|---|---|---|
| 认证 | gh auth login |
交互式登录 |
| 克隆仓库 | gh repo clone owner/repo |
自动补全 URL |
| 创建仓库 | gh repo create name --public --source=. --push |
创建并推送本地代码 |
| 创建 Issue | gh issue create --title "..." --body "..." |
支持 label/assignee |
| 创建 PR | gh pr create --fill |
自动从 commit 填充 |
| 查看 CI | gh run list --status failure |
只看失败的运行 |
| 监控 CI | gh run watch --exit-status |
实时跟踪进度 |
| 创建 Release | gh release create v1.0 --generate-notes |
自动生成 changelog |
| Checkout PR | gh pr checkout 15 |
本地拉取他人 PR |
| 合并 PR | gh pr merge 15 --squash --delete-branch |
Squash 合并并清理 |
十、常见陷阱与排错
| 问题 | 原因 | 解决方案 |
|---|---|---|
gh auth status 显示 token scope 不足 |
创建 token 时没勾选 workflow 权限 | gh auth refresh -s workflow 追加 scope |
gh pr create 报 "no upstream branch" |
本地分支未关联远程分支 | 先 git push -u origin branch-name |
gh run watch 一直等待 |
当前分支没有对应的 workflow 运行 | 用 gh run list 先确认 run ID |
| 企业版 GitHub 命令报错 | 默认连的是 github.com | gh repo clone owner/repo --hostname github.enterprise.com |
--fill 提取的 PR body 不对 |
最近一个 commit 没写 body | 手动 --body-file 或用 --body |
| 扩展安装后命令不存在 | 扩展脚本没有执行权限 | gh extension install 会自动 chmod,手动安装需 chmod +x gh-* |
| JSON 输出中字段名不确定 | 不同 API 版本字段可能变化 | 先用 --json 不加字段名查看所有字段 |
十一、最佳实践 Checklist
- 认证安全:使用浏览器认证而非明文 token;服务器环境用
GH_TOKEN环境变量而非--token参数 - 分支命名:配合
gh pr create --fill,遵循type/description命名规范(如feat/avatar-upload) - Commit 规范:遵循 Conventional Commits,
--fill会自动提取优质 PR 描述 - PR 模板:在仓库根目录放
.github/PULL_REQUEST_TEMPLATE.md,gh pr create会自动加载 - CI 监控:push 后立即
gh run watch --exit-status,串联到 git hook 实现自动化 - 批量操作:善用
--json+jq做复杂筛选和批量处理 - 扩展管理:定期
gh extension upgrade --all更新扩展 - 安全审计:定期检查
gh auth status确认 token scope 没有过度授权 - 缓存优化:
gh config set http_unix_socket ""可以解决某些代理环境下的缓存问题 - 团队协作:用
gh issue create --body-file配合 CSV 批量创建 Sprint 任务
十二、gh api:直接调用 GitHub REST/GraphQL API
当内置命令无法满足需求时,gh api 让你直接访问 GitHub 的完整 API。这是 gh 的终极武器——任何能在网页上做的事,都能通过 api 实现。
12.1 REST API 调用
# 获取仓库信息
gh api repos/cli/cli --jq '.description'

# 列出仓库的 contributor 数量
gh api repos/cli/cli/contributors --jq 'length'

# 搜索包含特定关键词的仓库
gh api "/search/repositories?q=language:python+stars:>10000&sort=stars" \
  --jq '.items[] | "\(.full_name) - \(.stargazers_count) stars"'

# 创建一个 webhook
gh api repos/owner/repo/hooks \
  --method POST \
  -f name="web" \
  -f active="true" \
  -f "events[]=push" \
  -f "events[]=pull_request" \
  -f "config[url]=https://example.com/webhook" \
  -f "config[content_type]=json"
12.2 GraphQL 查询
GraphQL 适合需要嵌套关联数据的场景,一次查询拿到多层信息:
# 查询仓库最近 5 个 PR 的标题、作者和 review 状态
gh api graphql -f query='
{
  repository(owner: "cli", name: "cli") {
    pullRequests(last: 5, states: OPEN) {
      nodes {
        number
        title
        author { login }
        reviews(last: 1) {
          nodes { state author { login } }
        }
      }
    }
  }
}' --jq '.data.repository.pullRequests.nodes[] | "PR #\(.number): \(.title) by @\(.author.login)"'
12.3 分页与速率限制
gh api 默认返回 30 条。用 --paginate 自动翻页:
# 获取仓库所有 issue(自动分页)
gh api repos/owner/repo/issues --paginate --jq '.[].title' > all-issues.txt

# 检查当前 API 速率限制
gh api rate_limit --jq '.resources.core | "剩余: \(.remaining)/\(.limit), 重置时间: \(.reset)"'注意:--paginate 会消耗大量 API 调用次数。如果数据量大,建议加 --slurp 合并结果,或用 -F per_page=100 减少请求次数。
十三、gh config:全局与本地配置管理
gh 的配置分为全局(~/.config/gh/config.yml)和仓库级(.github/ 目录)两层。常用配置项如下:
# 设置默认编辑器
gh config set editor vim

# 设置默认协议(https 或 ssh)
gh config set git_protocol ssh

# 设置默认分页器
gh config set pager less

# 查看所有配置
gh config list

# 设置提示符禁用(CI 环境中必须)
gh config set prompt disabled| 配置项 | 默认值 | 说明 |
|---|---|---|
git_protocol |
https | clone/fork 默认协议,企业内网可设为 ssh |
editor |
继承 $EDITOR | 创建 Issue/PR body 时的编辑器 |
prompt |
enabled | CI 环境必须禁用,否则命令会卡住 |
pager |
less | 长输出分页器,设为空字符串禁用 |
http_unix_socket |
空 | 代理环境下可能需要清空 |
十四、从手动到自动:一个完整的终端工作流
把前面学的串起来,这是一个真实的日常开发循环:
# 1. 开始新功能开发
git checkout -b feat/payment-integration

# 2. 写代码... 然后提交
git add -A && git commit -m "feat: 集成 Stripe 支付网关

- 添加 PaymentService
- 前端支付组件
- 单元测试覆盖"

# 3. 推送并创建 PR
git push -u origin feat/payment-integration
gh pr create --fill --reviewer "tech-lead" --label "feature"

# 4. 监控 CI
gh run watch --exit-status

# 5. CI 通过后查看 PR 状态
gh pr view --json state,reviewDecision,mergeable

# 6. Review 通过后合并
gh pr merge --squash --delete-branch

# 7. 创建 Release
gh release create v1.4.0 --generate-notes --latest

# 8. 回到主分支
git checkout main && git pull
整个过程没有离开终端。这就是 GitHub CLI 的价值——不是替代浏览器,而是把高频操作压缩到几行命令里,让开发者的注意力留在代码上。
如果你还没有把 gh 加入日常工具链,今天就开始吧。用一周时间,把上面的命令挨个试一遍,你会发现自己回浏览器的次数断崖式下降。